Hardhat for beginners: Setup and Testing

India
Hello readers👋
The web3 space is booming every day and more and more developers are diving into it and creating DApps every day. As more and more developers start looking into creating DApps, we need a sophisticated development process. Hardhat is one of the initiatives trying to solve this. Hardhat is a development environment that can help ease the development process of Ethereum based dApps.
If you are interested in learning about hardhat and want to setup your hardhat in your local environment for building DApps, you are at the right place.
Let's get started.
What is Hardhat?
First, let us understand what hardhat really is!
Hardhat is an environment developers use to test, compile, deploy and debug DApps based on the Ethereum blockchain. As such, it helps coders and developers to manage many of the tasks that are inherent to developing DApps and smart contracts. Along with providing developers with the proper tools to manage this process, Hardhat also helps automate some of these steps and provides developers with new, helpful functions.
Setting up Hardhat
Let us now setup hardhat in your local environment.
For hardhat, it is mandatory to have node package manager or npm installed on your machine. If you don't have npm installed, you can download node from here and you are all set to go further.
Create a new folder in your local machine named 'Hardhat Demo' and open it, say in Vscode.
Open the terminal inside the project directory and then run the following commands.
Initialize npm i.e simply generate an empty npm project -
npm init -y
Install hardhat -
npm install --save-dev hardhat
To create your hardhat project, you need to run the following command in your project folder.
npx hardhat
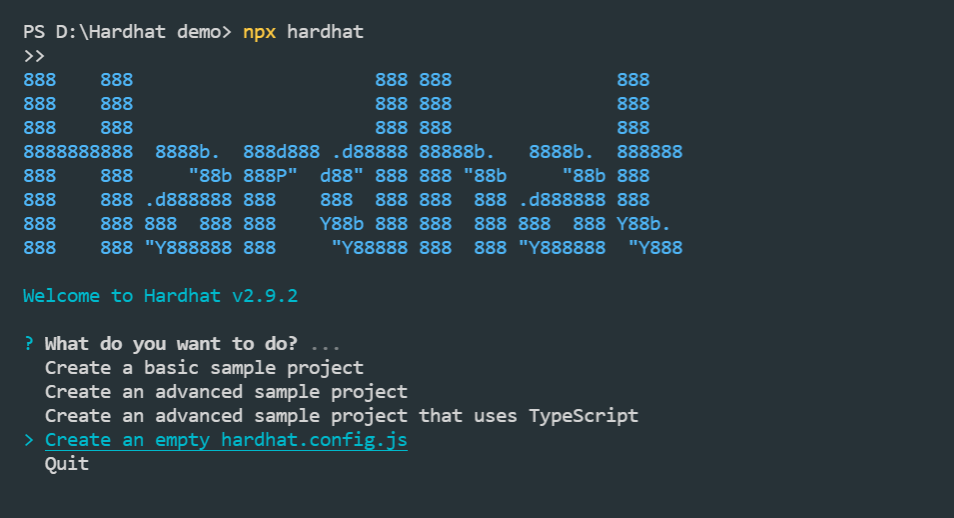
Select 'Create an empty hardhat.config.js' and then click enter. This will create a hardhat configuration file in which we will write our configurations.
Tasks in Hardhat
To get the list of built-in tasks you can use in your project, run the following command again and now you will get a list of tasks.
npx hardhat
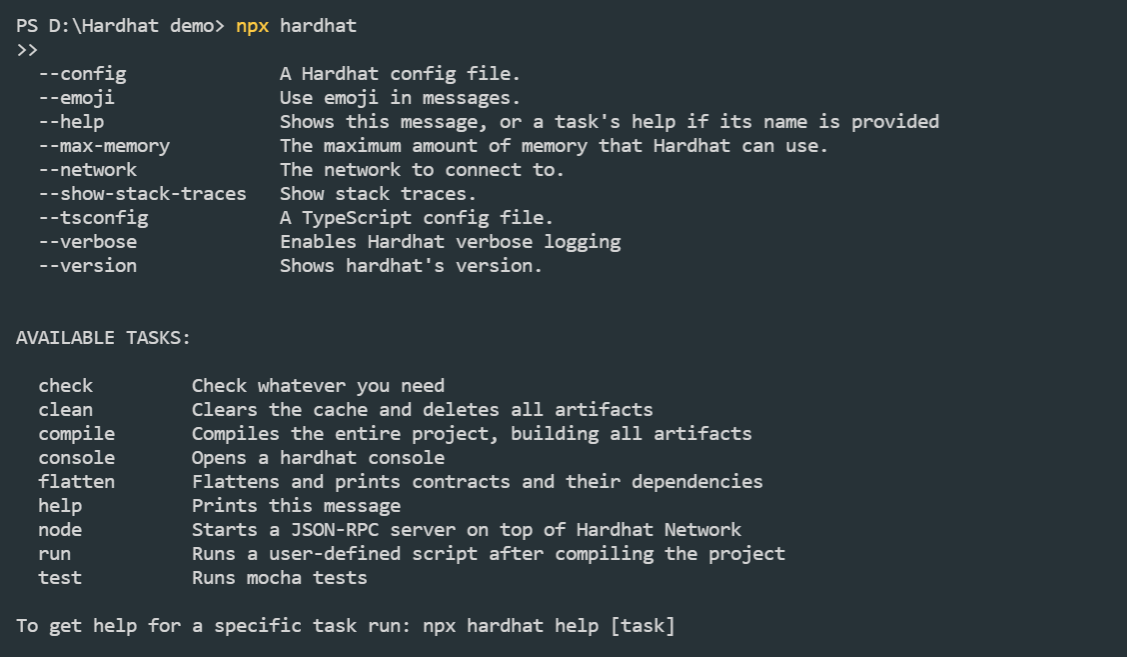
Further ahead, when you start using plugins to add more functionality, tasks defined by those will also show up here. This is your starting point to find out what tasks are available to run.
Plugins in Hardhat
If you want your Hardhat to be compatible with tests built with Waffle, you need to add the plugins - hardhat-waffle and hardhat-ethers. Run the following command -
npm install --save-dev @nomiclabs/hardhat-waffle ethereum-waffle chai @nomiclabs/hardhat-ethers ethers
Open the hardhat.config.js file and add the following require statement - require("@nomiclabs/hardhat-waffle"); to the top of it. Also, change the solidity version you will be using for the overall project. Let us say we will be using the Solidity version 0.8.0. The updated hardhat.config.js file should be like this -
require("@nomiclabs/hardhat-waffle");
module.exports = {
  solidity: "0.8.0",
};
Creating smart contracts
Create a new directory named 'contracts'. Let us create a new file inside this directory named Token.sol.
Add the following code inside the Token.sol file -
// SPDX-License-Identifier: MIT
pragma solidity ^0.8.0;

contract Token {
    string public name = "My Hardhat Token";
    string public symbol = "MHT";
    uint public totalSupply = 1000000;
    address public owner;
    mapping(address=>uint) balances;

    constructor() {
        balances[msg.sender] = totalSupply;
        owner = msg.sender;
    }

    function transfer(address to, uint amount) external {
        require(balances[msg.sender]>=amount,"Not enough tokens");
        balances[msg.sender] -= amount;
        balances[to] += amount;
    }

    function balanceOf(address account) external view returns(uint) {
        return balances[account];
    }
}
To compile your contracts, open the terminal and run the following command-
npx hardhat compile
You will now see two new folders named artifacts and cache in your directory. The result of the compilation is stored inside the artifacts folder.
Testing smart contracts
Create a new directory named 'test'. Let us create a new file inside this directory named Token.js.
Add the following code written for testing the smart contract inside the Token.js file -
const { expect } = require('chai');
const { ethers } = require('hardhat');

describe("Token contract", () => {
    let Token, token, owner, addr1, addr2;

    beforeEach(async () => {
        Token = await ethers.getContractFactory("Token");
        token = await Token.deploy();
        [owner, addr1, addr2, _] = await ethers.getSigners();
    });

    describe("Deployment", () => {
        it("Should set the right owner", async () => {
            expect(await token.owner()).to.equal(owner.address);
        });

        it("Should assign the total supply of tokens to the owner", async () => {
            const ownerBalance = await token.balanceOf(owner.address);
            expect(await token.totalSupply()).to.equal(ownerBalance);
        });
    });

    describe("Transactions", () => {
        it("Should transfer tokens between accounts",async () => {
            await token.transfer(addr1.address,50);
            const addr1Balance = await token.balanceOf(addr1.address);
            expect(addr1Balance).to.equal(50);

            await token.connect(addr1).transfer(addr2.address,50);
            const addr2Balance = await token.balanceOf(addr2.address);
            expect(addr2Balance).to.equal(50);
        });

        it("Should fail if sender doesn't have enough tokens", async () => {
            const initialBalanceOwner = await token.balanceOf(owner.address);

            await expect(
                token
                    .connect(addr1)
                    .transfer(owner.address, 1)
            )
                .to
                .be
                .revertedWith("Not enough tokens");

            expect (
                await token.balanceOf(owner.address)
            )
                .to
                .equal(initialBalanceOwner);
        });

        it("Should update balances after transfers", async () => {
            const initialBalanceOwner = await token.balanceOf(owner.address);

            await token.transfer(addr1.address,100);
            await token.transfer(addr2.address,50);

            const finalBalanceOwner = await token.balanceOf(owner.address);
            expect(finalBalanceOwner).to.equal(initialBalanceOwner-150);

            const addr1Balance = await token.balanceOf(addr1.address);
            expect(addr1Balance).to.equal(100);

            const addr2Balance = await token.balanceOf(addr2.address);
            expect(addr2Balance).to.equal(50);
        });
    });
});
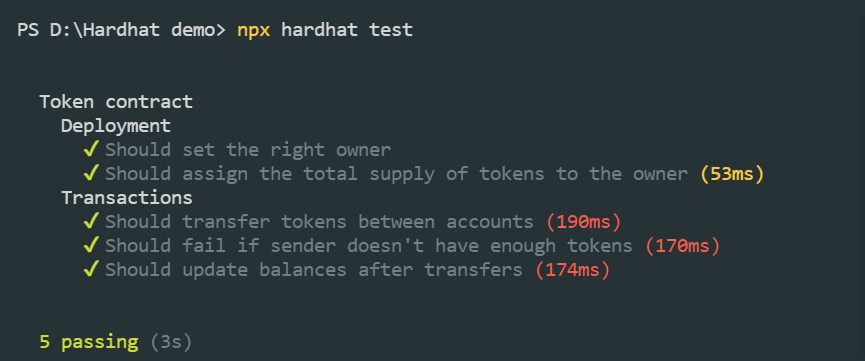
To run your tests, run the following command in your terminal -
npx hardhat test
You can check which of your tests passed and failed.
Debugging smart contracts
Open your contract Token.sol and let us see how can we debug our smart contracts. First, import the hardhat dependency in it i.e add the following line in your contract code just below the pragma solidity version
import "hardhat/console.sol";
This gives you the right to use console.log in your smart contract files.
For example, you can update your Token.sol file as follows
// SPDX-License-Identifier: MIT
pragma solidity ^0.8.0;

import "hardhat/console.sol";

contract Token {
    string public name = "My Hardhat Token";
    string public symbol = "MHT";
    uint public totalSupply = 1000000;
    address public owner;
    mapping(address=>uint) balances;

    constructor() {
        balances[msg.sender] = totalSupply;
        owner = msg.sender;
    }

    function transfer(address to, uint amount) external {
        console.log("Sender balance is %s tokens",balances[msg.sender]);
        console.log("Trying to send %s tokens to %s",amount , to);
        require(balances[msg.sender]>=amount,"Not enough tokens");
        balances[msg.sender] -= amount;
        balances[to] += amount;
    }

    function balanceOf(address account) external view returns(uint) {
        return balances[account];
    }
}
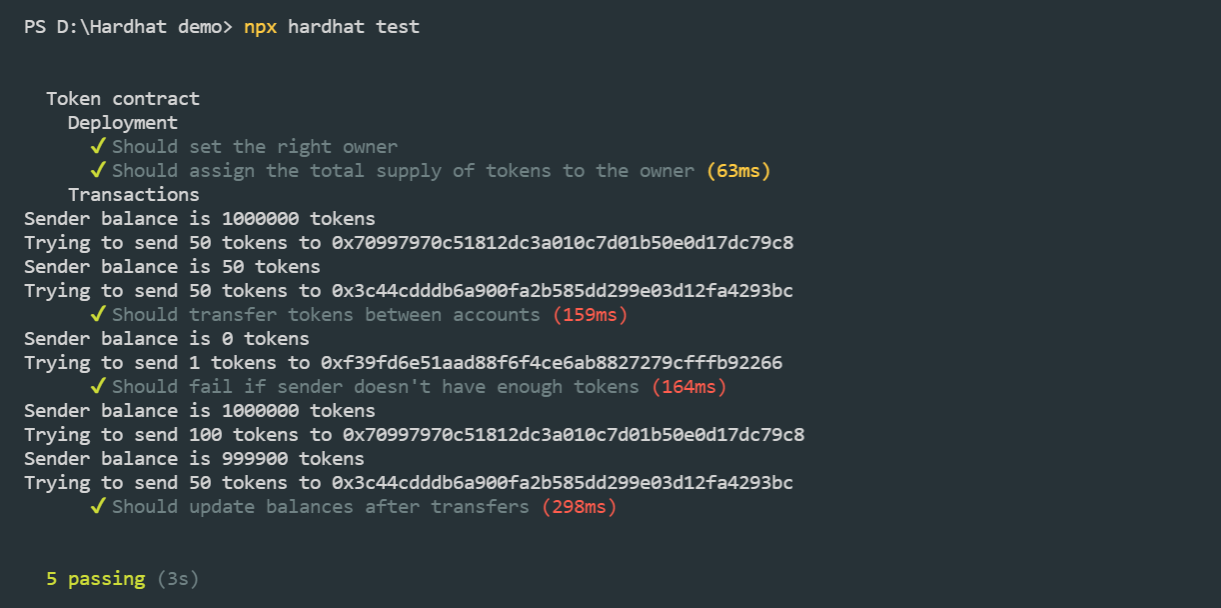
Now if you run the npx hardhat test command again, you could see the console log statements printed too.
Deploying smart contracts to a local blockchain
Create a new directory named 'scripts'. Let us create a new script file inside this directory named deploy.js.
Add the following code to the deploy.js file.
const { ethers } = require("hardhat");

 async function main() {
    const [deployer] = await ethers.getSigners();
    console.log(`Deploying contracts with the account: ${deployer.address}`);

    const balance =await deployer.getBalance();
    console.log(`Account balance: ${balance.toString()}`);

    const Token = await ethers.getContractFactory("Token");
    const token = await Token.deploy();
    console.log(`Token address: ${token.address}`);
 }

 main()
    .then(() => process.exit(0))
    .catch(error => {
        console.error(error);
        process.exit(1);
    });
To deploy to a local blockchain, run the following command
npx hardhat run scripts/deploy.js
You could see the following output -

Deploying smart contracts to the public blockchain (Rinkeby Test network)
Now we deploy our project to a public blockchain say Rinkeby test network.
We need Metamask for the deployment which we have already set up.
We also need to create an Infura endpoint.
Creating Infura endpoint
We need an API through which we can access the rinkeby network. Why Infura? Infura is used to access the test/main network and deploy our contract on them.
Let us create an infura endpoint on the rinkeby network
- Go to infura.io
- Sign up there if you don't have an account
- Go to the dashboard and click on the 'Create new project' button visible on the top right section of the screen.
- Select Product as Ethereum and Project name as 'Hardhat demo' and click on Create.
- After creating the project, you can see that you get project id, secret, and endpoints for the rinkeby network. We will use this further.

Configuring hardhat.config.js
Now we have an endpoint from the infura account and the private key of your metamask account.
First, we create a new file named 'secrets.json' to store the private key and Infura endpoint. Add the following code inside the secrets.json file.
{
    "privateKey": "Your private key of metamask account",
    "projectEndpoint": "Your Infura project endpoint"
}
The above project endpoint looks like this - https://rinkeby.infura.io/v3/YOUR_PROJECT_ID
Make sure to add the secrets.json file to .gitignore. Create a .gitignore file and add the following line to it.
secrets.json
Now we need to first fetch our private key and project endpoint from the secrets.json file inside our hardhat.config.js file. Add the following line inside hardhat.config.js above module.exports.
const { privateKey, projectEndpoint } = require('./secrets.json');
You can update your hardhat.config.js file as follows -
require("@nomiclabs/hardhat-waffle");

const { privateKey, projectEndpoint } = require('./secrets.json');

module.exports = {
  solidity: "0.8.0",
  networks: {
    rinkeby: {
      url: projectEndpoint,
      accounts: [`0x${privateKey}`]
    }
  }
};
Now to deploy your contract to the rinkeby public blockchain, run the following command -
npx hardhat run scripts/deploy.js --network rinkeby

That’s all done.
Your contract is successfully deployed on the public blockchain. You can check the token address on Etherscan too.
Note:
To deploy on the main network i.e mainnet, get the infura endpoint for the mainnet network, and configure the config file.
Replace rinkeby with mainnet inside the networks.
Then in the terminal run the command npx hardhat run scripts/deploy.js --network main.
Integrating with frontend
Create a directory named frontend to write all your frontend code there. Then inside the frontend directory, create a new directory named src
Open the terminal inside the frontend i.e cd frontend and run the following command -
npx hardhat node
After running this command, you would get your localhost URL and also 20 accounts with their private keys having 10000 ether each.
To let our contract integrate with the front end, we need the contract address and abi of the contract.
Update the deploy.js file as follows to get the contract address and abi.
const { ethers } = require("hardhat");

const fs = require("fs"); // Import this

 async function main() {
    const [deployer] = await ethers.getSigners();
    console.log(`Deploying contracts with the account: ${deployer.address}`);

    const balance =await deployer.getBalance();
    console.log(`Account balance: ${balance.toString()}`);

    const Token = await ethers.getContractFactory("Token");
    const token = await Token.deploy();
    console.log(`Token address: ${token.address}`);

   // Fetch contract address and abi here
   const data = {
      address: token.address,
      abi: JSON.parse(token.interface.format('json'))
   }
   // Write the data to the file in the path specified
   fs.writeFileSync("frontend/src/Token.json",JSON.stringify(data));
 }

 main()
    .then(() => process.exit(0))
    .catch(error => {
        console.error(error);
        process.exit(1);
    });
Now, deploy your contract with the following blockchain (Make sure your node is running before running this command, otherwise you might get an error)
npx hardhat run scripts/deploy.js --network localhost
Now you can check the Token.json file in the frontned/src folder which will now contain the contract address and the abi.
Now, create a new file named ethereum.js and write the following code inside it -
import { ethers, Contract } from 'ethers';
import Token from './Token.json';

const getBlockchain = () =>
  new Promise((resolve, reject) => {
    window.addEventListener('load', async () => {
      if(window.ethereum) {
        await window.ethereum.enable();
        const provider = new ethers.providers.Web3Provider(window.ethereum);
        const signer = provider.getSigner();
        const signerAddress = await signer.getAddress();
        const token = new Contract(
          Token.address,
          Token.abi,
          signer
        );

        resolve({signerAddress, token});
      }
      resolve({signerAddress: undefined, token: undefined});
    });
  });

export default getBlockchain;
Now in the App.js file of your frontend, you can import the token by calling the getBlockchain function and you are all set to go.
Now, you can easily create DApps with testing with hardhat and easily integrate it with the frontend.
Hardhat Gas Reporter
Let's see how to determine gas usage by our functions.
In order to get gas costs of your solidity functions created using hardhat, you need to add the hardhat gas reporter plugin.
First, install the plugin using the following command:
npm install hardhat-gas-reporter --save-dev
Then add the following line to the hardhat.config.js file
require("hardhat-gas-reporter");
Then, you can simply turn this plugin on or off by using the following logic inside module.exports in your hardhat.config.js file.
module.exports = {
  gasReporter: {
    enabled: true // True or false depending on what you need
  }
}
Now you can generate gas reports by using the same test command which checks all your tests and also gives the gas reports.
npx hardhat test
Now you could see the output as follows:
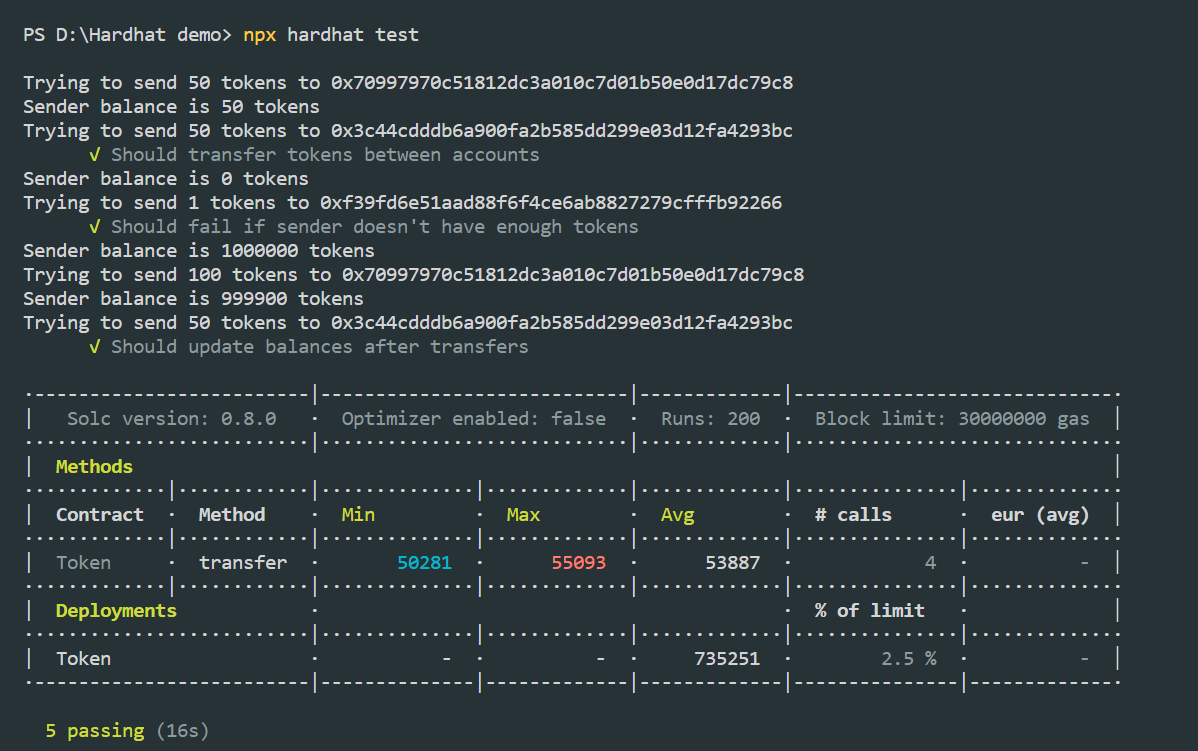
This shows the average gas consumption for both minting and deploying the contract. These are denoted in units of gas.
In order to calculate how much this would cost in ETH, we can use this formula:(gas units) * (gas price per unit) = gas fee in gwei
Here,
- gas units = 53887 (for the transfer function)
- gas price per unit (at the time of writing this blog) = 60 Gwei {This value can be fetched from here}
We get
gas fees in Gwei = 53887*60 = 3233220 Gwei = 0.00323322 ETH
Similarly, for deployment-
gas fees in Gwei = 735251*60 = 44115060 Gwei = 0.04411506 ETH
These are the ether charges for solidity functions and deployment.
Conclusion
This is the end of the blog. Now, you are able to easily build projects with Hardhat.
All the best!I hope you find it helpful. Let me know your thought in the comment below.
Do like this blog and follow me!
Also, you could follow me on Twitter
Thanks for reading💛


